LangGraph#
LangGraph is a framework that allows you to define execution flows. It is designed for building agentic systems.
Check the LangGraph reference for official detailed explanation of the main features of the LangGraph.
from typing import TypedDict, Literal, Annotated

import langgraph
from langgraph.types import Command
from langgraph.graph import END, START, StateGraph
State#
The state is the object that moves through the entire graph. It provides the input information to the nodes and passes the information from the current node to the next one.
The schema of the State must be provided when defining of the langgraph.graph.StateGraph. Supported ways to define a schema include: typing.TypedDict, dataclasses.dataclass, or pydantic.BaseModel.
Check more cases in the State
Consider a case in which the state is defined as a dataclass. The following cell creates a graph that processes a State dataclass instance and increments the inp attribute.
from dataclasses import dataclass


@dataclass
class State:
    inp: int


def my_node(state: State):
    print(state)
    state.inp += 1
    return state


builder = StateGraph(State)
builder.add_node("my", my_node)

builder.add_edge(START, "my")
builder.add_edge("my", END)

graph = builder.compile()
The following cell invokes the graph for State(inp=4).
graph.invoke(State(inp=4))
State(inp=4)
{'inp': 5}
Reducing#
If two graph flows join at the same node and both return a value, there will be a conflict. You must specify a strategy for merging the outputs using a reducer function.
THe reducer function can be defined as metatdata of the typing.Annotated for the specific attribute. This function will be applied if the outputs from those nodes need to be processed in some way. The most common way is to use the operator.add function, which is equivalent to simply apply the + operator.
Check more in Reducing page.
The following cell shows the definition of the state that applies operator.add when there are two outputs in a node.
import operator


class State(TypedDict):
    out: Annotated[str, operator.add]
The next code creates a graph with two parallel nodes, each attempt to update the out attribute of the state.
def node_a(state: State) -> State:
    return State(out="A output")


def node_b(state: State) -> State:
    return State(out="B output")


builder = StateGraph(State)

builder.add_node("a", node_a)
builder.add_node("b", node_b)
builder.add_edge(START, "a")
builder.add_edge(START, "b")

graph = builder.compile()
graph.invoke(State(out="value"))
{'out': 'valueA outputB output'}
As a result, the outputs of the different nodes were simply concatenated.
Composition#
There is a set of tricks that will enable you to create the graph you want. You can set up:
Some nodes can invoke several subsequnt nodes.
You can define conditions to select the nodes will be executed next in runtime.
There are some pre-built components with special properties.
You can include a subgraphs in your graphs.
Check more in Composition page.
Conditional edges#
Conditional edges allow you to define a graph that will go one way or another depending on the conditions.
You can define the conditional node using:
Adding the node that returns
langgraph.types.Commandwithgotospecifying the name of the next node.Adding the edge with
add_conditional_edgemethod of the graph builder.
Find out more in the Conditional edges.
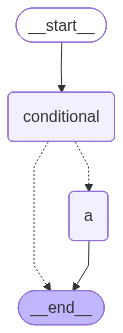
The following cell defines the conditional node that directs the execution to either the END or "a" node, depending on the corresponding value of the state["goto"].
class State(TypedDict):
    goto: Literal["a", "__end__"]


def node_a(state: State) -> State:
    print("a node is invoked")
    return state


def conditional_node(state: State) -> Command[Literal["a", "__end__"]]:
    return Command(update=state, goto=state["goto"])


graph = (
    StateGraph(State)
    .add_node("conditional", conditional_node)
    .add_node("a", node_a)

    .add_edge(START, "conditional")
    .add_edge("a", END)
    .compile()
)
graph
The following cell invokes the graph with to be executed with the "a" node.
_ = graph.invoke(State(goto="a"))
a node is invoked
And alternatively routing directly to the __end__.
_ = graph.invoke(State(goto="__end__"))
We always receive messages from random nodes, but always only two of them.
Memory#
You can save the state between the graph infocations. During graph compilation, you must pass a checkpointer object. This object will keep the output of the previous invocation bounded to thread. The thread is specified by the configurable.thread_id field of the configuration argument.
Check more details in the Memory page of the documentation.
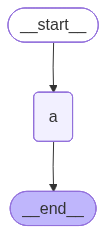
The following cell builds and compiles the graph. Note that the checkpointer passes an InMemorySaver instance, which stores the information about the outputs of the last invocation in memory. Each time the graph is invoked, a random number is added to the input.
import operator
from random import randint
from typing import Annotated
from langgraph.checkpoint.memory import InMemorySaver

in_memory_saver = InMemorySaver()


class State(TypedDict):
    value: Annotated[list[int], operator.add]


def node_a(state: State) -> State:
    return State(value=[randint(0, 10)])


graph = (
    StateGraph(State)
    .add_node("a", node_a)

    .add_edge(START, "a")
    .add_edge("a", END)

    .compile(checkpointer=in_memory_saver)
)
graph
Invoking such a graph requires specifying the thread because memory is bounded by the thread.
graph.invoke(
    State(value=[]),
    {"configurable": {"thread_id": 1}}
)
{'value': [9]}
The second invocation with the same specified thread contains the output of the previous invocation, plus the new generated number:
graph.invoke(
    State(value=[]),
    {"configurable": {"thread_id": 1}}
)
{'value': [9, 2]}
The invocation in the other thread yelds a new number:
graph.invoke(
    State(value=[]),
    {"configurable": {"thread_id": 2}}
)
{'value': [8]}
Interrupt#
The graph interrupting is a typicall solution involved in popular use cases, such as those associated with the human-in-the-loop approach. There are a few important concepts important to understand in order to implement graph interruption/continuation in LangGraph:
You can setup the graph interrupting by using:
langgraph.types.interruptfunction from the node of the graph.interrupt_beforeandinterrupt_afterargumens for the graph compilation.
You can get information describing the interruption by:
Using the
__interrupt__attribute returned by the interrupted graph.Some information can be extrated from the snapshot saved by the checkpointer.
To be able to continue the executing the graph, it must have to be compiled with a checkpointer, which stores the information about all graph’s states, and can resume the interrupted ones.
Find out more in the Interrupt page.
The following cell defines the one-node graph that interrupts during the excution, allowing you to the kind of output produced.
from langgraph.checkpoint import memory
from langgraph.types import interrupt


class State(TypedDict):
    pass


def node_a(state: State) -> State:
    interrupt("Interupted info")
    return state


graph = (
    StateGraph(State)
    .add_node("a", node_a)
    .add_edge(START, "a")
    .add_edge("a", END)
    .compile(checkpointer=memory.InMemorySaver())
)
The following cell shows the outputs of the interrupted graph.
thread = {"configurable": {"thread_id": "1"}}
graph.invoke(State(), thread)
{'__interrupt__': [Interrupt(value='Interupted info', id='0e04d2b8a02da9b262ca333273e6208c')]}
The get_state method of the graph returns the state snapshot for the given thread. For example, you can get information about the following node that would be executed using the next attribute:
graph.get_state(thread).next
('a',)
Streaming#
The Langgraph’s compiled graph allows to stream the process of graph execution using different approaches:
The
streamandastreammethods enable iteration over changing state of the graph.The
astream_eventsmethod allows to iterate over langgraph events that are discrete phases in langgraph logic.
Check more in the streaming page of the documentation.
Runtime#
Runtime is the information that is passed to your graph by the LangGraph engine.
It contains:
context: the information specific for the current run.store: the information that presists across different threads and conversations.stream_writer: the special function that defines the rules for how the graph communicates with external systems.
You can access the runtime as the second argument in your nodes.
The following cell defines the graph, that prints its runtime and invokes the graph with some context.
from langgraph.runtime import Runtime


def node(state: dict, runtime: Runtime) -> dict:
    print(runtime)
    return {}


graph = (
    StateGraph(dict)
    .add_node("node", node)
    .add_edge(START, "node")
    .add_edge("node", END)
    .compile()
)

_ = graph.invoke(
    {},
    context="custom condext"
)
Runtime(context='custom condext', store=None, stream_writer=<function Pregel.stream.<locals>.stream_writer at 0x70846bce7420>, previous=None)
The context value specified is in the corresponding attribute of the runtime.
Context schema#
You may encounter some annotation issues when using the context schema:
The function that implements nodes specifires the type of context schema to be expected.
The graph itself does not know which type to expect as the
contextargument of theinvokemethod.
To solve all this issuse you have to:
Specify the generic argument of the runtime parameter annotation of the node as the context schema type. (
def node(state: State, runtime: Runtime[<the type of the schema>])).Specify the
context_schemaparameter when defining the graph.
The following cell shows the graph with the specified context schema.
from pydantic import BaseModel


class RuntimeContext(BaseModel):
    val1: int
    val2: str


def node(state: dict, runtime: Runtime[RuntimeContext]) -> dict:
    print(runtime)
    return {}


graph = (
    StateGraph(dict, context_schema=RuntimeContext)
    .add_node("node", node)
    .add_edge(START, "node")
    .add_edge("node", END)
    .compile()
)

_ = graph.invoke(
    {},
    context=RuntimeContext(val1=10, val2="hello")
)
Runtime(context=RuntimeContext(val1=10, val2='hello'), store=None, stream_writer=<function Pregel.stream.<locals>.stream_writer at 0x70846be49c60>, previous=None)
Application#
LangGraph has an integrated http server that anables communication with the specified graph, allowing you to deploy your graph as an independent application.
The important here is that:
Your project have to have a specific structure.
Install optional
pip3 install langgraph-cli[inmem].Use the langgraph studio to debut your application.
Check a Run a local server as an initial tutorial.
The following cell setsup the simplest possible langgraph application.
!rm -rf /tmp/studio && mkdir /tmp/studio
%%writefile /tmp/studio/my_graph.py
from typing import TypedDict
from langgraph.graph import StateGraph, START, END

class State(TypedDict):
    message: str

def node(state: State) -> State:
    return {"message": state["message"] + " Hello from graph!"}

state_graph = (
    StateGraph(State)
    .add_node("a", node)
    .add_edge(START, "a")
    .add_edge("a", END)
).compile()
Overwriting /tmp/studio/my_graph.py
By settings LANGSMITH_TRACING=false environment variable you can turn off the tracking with langsmith.
%%writefile /tmp/studio/.env
LANGSMITH_TRACING=false
Writing /tmp/studio/.env
The langgraph.json determines the langgraph application.
%%writefile /tmp/studio/langgraph.json
{
    "dependencies": [
        "langgraph"
    ],
    "graphs": {
        "my_agent": "./my_graph.py:state_graph"
    },
    "env": ".env"
}
Writing /tmp/studio/langgraph.json
Run your langgraph application with commands:
cd /tmp/studio
langgraph dev
You can access the UI of the studio from the LangSmith site typically: https://smith.langchain.com/studio/?baseUrl=<local address of your application>.
Your graph is now available via http. You can use the LangGraph SDK to interact with the application.
The following cells demonstrate how you can invoke the graph deployed as the application.
from langgraph_sdk import get_sync_client

client = get_sync_client(url="http://localhost:2024")
assistants = client.assistants.search()
thread = client.threads.create()

assistant_id = assistants[0]["assistant_id"]
thread_id = thread["thread_id"]

for event in client.runs.stream(
    thread_id,
    assistant_id,
    input={"message": "Hello from SDK!"},
    stream_mode="values",
):
    print(event)
StreamPart(event='metadata', data={'run_id': '019bad7f-636f-7b13-85d5-7754df873e17', 'attempt': 1}, id=None)
StreamPart(event='values', data={'message': 'Hello from SDK!'}, id=None)
StreamPart(event='values', data={'message': 'Hello from SDK! Hello from graph!'}, id=None)